So there's progress being made, and at the same time life and its sundry responsibilities go on. Here's evidence of what else I've spent time doing lately:
4/07/2008


1/13/2008
Heavy Lifting
The day finally arrived: time to bolt on the electric motor!
EV America calls this system "clutchless," although the car's original clutch disc is in fact put to use here (see below). In the end, there'll be no need to engage a clutch to shift gears, because the electric motor's high starting torque makes it possible to get going in 4th gear, if you want. So the plan here is to permanently mount the motor to the transmission's input shaft using a coupler, an adapter plate, plus any necessary spacers.
Make sure you've got these tools nearby: drill press and bits, metric and SAE sockets, torque and ratchet wrenches, hex keys, a pneumatic cutting wheel, floor jack, Loctite®, lipstick and some dependable man power.
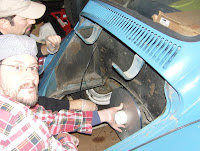 The electric motor attaches to the old VW transmission via a ½ inch aluminum plate, which arrived as a big square with holes drilled for motor. Earlier, we had this square plate cut down to an appropriately sized circle, so the first step today was to determine where to drill holes to bolt this plate to the transmission. Here's a picture of the plate aligned on the input shaft with the white cylindrical alignment tool loaned from EV America.
Once the plate was aligned, mark the upper mount holes with a sharp drill bit pushed in from behind--aluminum gouges nicely with a few twists of the steel bit--and the lower mount holes with lipstick. (Thanks, Mom!)
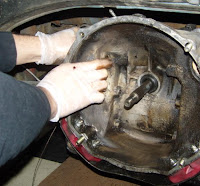 With holes drilled in the plate, pull the transmission's throwout bearing and component pieces and plug the holes left by their removal (underneath Dan's right finger; note the surgical gloves--a nice thing to have when digging around in all this ancient grease) and also by the removal of the old electric starter, equally obsolete. A heavy duty bolt works for the former, a sturdy sheet of metal for the latter.

Next come the fireworks: cut off the excess length of the pilot shaft that once guided the engine back onto the transmission when shifting. Cross your fingers and hope the sparks don't start a fire in the oil spill underneath the car.
On to the electric sandwich.
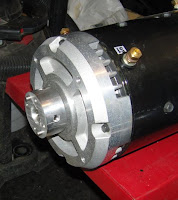 First, mount the motor coupler to the motor's driveshaft. This piece will ultimately lie behind the adapter plate, out of sight inside the transmission, so check that it has clearance your motor-to-adapter-plate mounting bolts before tightening. (The coupler is the can-of-tuna-sized piece of aluminum sticking out to the left here; ultimately, we pulled it out another .125 inch to clear the bolt heads and lock nuts.)
 Next in the sandwich: connect any spacer(s) to your adapter plate. (All of these pieces were provided by EV America, based on measurements of the transmission and the input shaft we supplied very early on.) Then slip the plate over the coupler and onto the motor. Warning: Make sure you bolt it down with the side you want the world to see facing the motor!
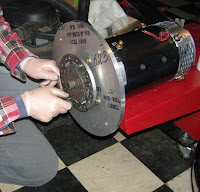 Now attach the old cluth disc to the motor coupling (the old clutch disc has splines that mate to the original transmission input shaft, so you've got a little recycling at the heart of this new drive system). This is the point where you'll see if, a few steps back, you left enough clearance between this twirling disc and the bolts that hold the motor to the adapter plate.
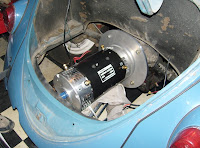 And finally: the moment of truth. Assuming you've tightened every screw and bolt and layered things in the right order, lift this little baby up into the engine bay. Align the splines of the clutch disc onto the transmission input shaft. Slip bolts through the holes you drilled in the adapter plate. Center it all where you want it, torque it all down, and stand back and marvel!
All in all, this took 3-4 hours, as we worked fairly cautiously and made missteps here and there. What great day, though. The first work that was all about putting new things on instead of taking old things off.
EV America calls this system "clutchless," although the car's original clutch disc is in fact put to use here (see below). In the end, there'll be no need to engage a clutch to shift gears, because the electric motor's high starting torque makes it possible to get going in 4th gear, if you want. So the plan here is to permanently mount the motor to the transmission's input shaft using a coupler, an adapter plate, plus any necessary spacers.
Make sure you've got these tools nearby: drill press and bits, metric and SAE sockets, torque and ratchet wrenches, hex keys, a pneumatic cutting wheel, floor jack, Loctite®, lipstick and some dependable man power.
 The electric motor attaches to the old VW transmission via a ½ inch aluminum plate, which arrived as a big square with holes drilled for motor. Earlier, we had this square plate cut down to an appropriately sized circle, so the first step today was to determine where to drill holes to bolt this plate to the transmission. Here's a picture of the plate aligned on the input shaft with the white cylindrical alignment tool loaned from EV America.
Once the plate was aligned, mark the upper mount holes with a sharp drill bit pushed in from behind--aluminum gouges nicely with a few twists of the steel bit--and the lower mount holes with lipstick. (Thanks, Mom!)
 With holes drilled in the plate, pull the transmission's throwout bearing and component pieces and plug the holes left by their removal (underneath Dan's right finger; note the surgical gloves--a nice thing to have when digging around in all this ancient grease) and also by the removal of the old electric starter, equally obsolete. A heavy duty bolt works for the former, a sturdy sheet of metal for the latter.
Next come the fireworks: cut off the excess length of the pilot shaft that once guided the engine back onto the transmission when shifting. Cross your fingers and hope the sparks don't start a fire in the oil spill underneath the car.
On to the electric sandwich.
 First, mount the motor coupler to the motor's driveshaft. This piece will ultimately lie behind the adapter plate, out of sight inside the transmission, so check that it has clearance your motor-to-adapter-plate mounting bolts before tightening. (The coupler is the can-of-tuna-sized piece of aluminum sticking out to the left here; ultimately, we pulled it out another .125 inch to clear the bolt heads and lock nuts.)
 Next in the sandwich: connect any spacer(s) to your adapter plate. (All of these pieces were provided by EV America, based on measurements of the transmission and the input shaft we supplied very early on.) Then slip the plate over the coupler and onto the motor. Warning: Make sure you bolt it down with the side you want the world to see facing the motor!
 Now attach the old cluth disc to the motor coupling (the old clutch disc has splines that mate to the original transmission input shaft, so you've got a little recycling at the heart of this new drive system). This is the point where you'll see if, a few steps back, you left enough clearance between this twirling disc and the bolts that hold the motor to the adapter plate.
 And finally: the moment of truth. Assuming you've tightened every screw and bolt and layered things in the right order, lift this little baby up into the engine bay. Align the splines of the clutch disc onto the transmission input shaft. Slip bolts through the holes you drilled in the adapter plate. Center it all where you want it, torque it all down, and stand back and marvel!
Hallelujah!
All in all, this took 3-4 hours, as we worked fairly cautiously and made missteps here and there. What great day, though. The first work that was all about putting new things on instead of taking old things off.
1/12/2008
Tracking Packs and Training Schmucks
Dropped in on the Denver Electric Vehicle Council meeting today--held in Boulder, doncha know--and walked away feeling buzzed, like an acolyte who was eavesdropping on the Council of Trent. They knew so much, I knew so little, and yet nobody kicked me out of the room.
 This particular meeting concerned the PakTrakr, a battery monitoring system built by Ken Hall & co. up in Windsor, Colorado. The PakTrakr is a single instrument that can do the work of voltmeter, ammeter, and a whole lot more. I'm miles away from putting batteries in the car, and I don't yet know the dark art of monitoring volts and amps, but it's not too early to start thinking about batteries.
For simplicity and economy, in the end I'll probably load the car up with six garden variety, 12-volt, deep cycle batteries, but here are some things worth considering:
 This particular meeting concerned the PakTrakr, a battery monitoring system built by Ken Hall & co. up in Windsor, Colorado. The PakTrakr is a single instrument that can do the work of voltmeter, ammeter, and a whole lot more. I'm miles away from putting batteries in the car, and I don't yet know the dark art of monitoring volts and amps, but it's not too early to start thinking about batteries.
For simplicity and economy, in the end I'll probably load the car up with six garden variety, 12-volt, deep cycle batteries, but here are some things worth considering:
- No battery pack (collection of separate batteries, wired together to supply the juice) will be ever be perfectly balanced, and weaker batteries charge faster, causing over-charging, thus
- Charging the whole pack without attention to the weaker links will inevitably cause trouble, and
- Trouble = $$, needless frustration and other "events" (explosions, fires, etc.).
1/01/2008
Onward!
With both the holiday season and my faithful assistant's prostatectomy now in the past (as he puts it, "I used to have prostate cancer; now I have neither"), let's make some headway with this project!
Today's work goes like this. After more hours than I care to relate--generally trying to wrestle a 45-year-old chunk of magnesium alloy into submission--the Bug now has has two new, bright red, polyurethane transmission mounts. And don't they look gorgeous? Basically, this was prep work for what comes first in the conversion: installing the electric motor. The new motor and the old engine don't resemble each other in the least, so to mount the electric motor to the transmission you've got to use an adapter plate. And because the old rubber transmission mounts would have kept the adapter plate from fitting flush against the transmission--they'd squished out past the edge of the bell like little love handles--they had to go.
Coming up: aligning that adapter plate on the input shaft to mark and bore it for mounting; assembling a repurposed clutch to the motor with adapter plate and spacer sandwiched between; then bolting it all onto the old gearbox. The date: a week from Sunday.
Today's work goes like this. After more hours than I care to relate--generally trying to wrestle a 45-year-old chunk of magnesium alloy into submission--the Bug now has has two new, bright red, polyurethane transmission mounts. And don't they look gorgeous?
 Basically, this was prep work for what comes first in the conversion: installing the electric motor. The new motor and the old engine don't resemble each other in the least, so to mount the electric motor to the transmission you've got to use an adapter plate. And because the old rubber transmission mounts would have kept the adapter plate from fitting flush against the transmission--they'd squished out past the edge of the bell like little love handles--they had to go.
Coming up: aligning that adapter plate on the input shaft to mark and bore it for mounting; assembling a repurposed clutch to the motor with adapter plate and spacer sandwiched between; then bolting it all onto the old gearbox. The date: a week from Sunday.
11/02/2007
Waiting
 To kick things off, I pulled the engine out last summer, an experience not quite like the one illustrated above, but close. (Instead of lifting the rear high enough to pull the dead weight of 40 horses under the bumper, take off one of the rear wheels, then inch the motor out sideways through the open well.) At this writing, the engine still sits in my garage, awaiting a buyer. No reasonable offer refused.
Later in the summer, we transfered the car via trailer 70 miles south to my father's house for more space, more tools and more know-how. Days ago, parts began to arrive, and with them this dream started to feel a little more like a possibility: that just maybe we could get this electric Bug on the road before the first winter snows.
But wait a minute--here comes a cold splash of reality: about the same time as the big, heavy boxes are dropping at my front door, Dad learns he has prostate cancer. He'll have surgery as early as possible--early December. And suddenly, his calendar has filled up with other, more necessary obligations than turning an old Volkswagen into an electric car. As a result and for good reason, right now the Bug sits in his garage, next to his highboy, powerless and waiting.
The truth is, there's another story going on here: Very early in the planning for all this, I realized it was not only an engineering project, but also a father-son project. It's been nearly a decade since I asked his help with a big piece of work, and I guess I've been missing the problem-solving and heavy lifting we've done in the past. Also I'm smart enough to know that right now I cannot do this by myself.But wait a minute--here comes a cold splash of reality: about the same time as the big, heavy boxes are dropping at my front door, Dad learns he has prostate cancer. He'll have surgery as early as possible--early December. And suddenly, his calendar has filled up with other, more necessary obligations than turning an old Volkswagen into an electric car.
 As a result and for good reason, right now the Bug sits in his garage, next to his highboy, powerless and waiting.
So VW, wait a little longer. First everything must be in place....
10/13/2007
First Steps
One way to begin a big engineering project like this, especially if you were an English major like me: tell people you're going to do it. Eventually you'll have to make your first move just to maintain your credibility.
Also, do your research. Using information culled from the Austin EV club, a friend made a spreadsheet weighing choices made by other folks in the conversions of their VWs. Also I got in contact with my high school shop teacher, who had converted a Bug of his own a decade ago. With this guidance and advice, ultimately I decided to build a car that had a top speed of 40 - 50 mph and a range of about 40 miles. Electric Vehicles of America, of Wolfeboro, New Hampshire, suggested these parts would do the trick:
Also, do your research. Using information culled from the Austin EV club, a friend made a spreadsheet weighing choices made by other folks in the conversions of their VWs. Also I got in contact with my high school shop teacher, who had converted a Bug of his own a decade ago. With this guidance and advice, ultimately I decided to build a car that had a top speed of 40 - 50 mph and a range of about 40 miles. Electric Vehicles of America, of Wolfeboro, New Hampshire, suggested these parts would do the trick:
 *
*
Last week, after months of talking about it and reading about it and doing things that couldn't quickly be undone (like removing the engine and cutting the gas tank in half), I took the plunge and placed my order.
Before I go on, this would be a good point to tell you another part of the story. Back when I first started getting serious about this, I promised myself and my wife that I'd pay for the project with money earned by getting rid of other stuff: mountains of CDs, comic books, old musical instruments, etc.
So with the parts on the way--and an old trombone out of the closet--here's what the balance sheet looks like:
Spent: $-2900
Earned: $ 225
------
Total: $-2675
Stay tuned ....
* EV America also quoted prices for an on-board battery charger and instrumentation, but I'm waiting on those until the rest of the car is configured.
10/10/2007
The Story So Far
For my money, there's nothing like an old Volkswagen Beetle. Inside a body full of curves, with a mighty little engine pushing from behind, you bathe in a kind of perfume--the musky scent of slow-baked horsehair, German vinyl and god-knows-what-else.... Oh how I love thee, VW Bug.
Somehow I convinced my wife to let me buy one on eBay a few years ago, a 1963 model with 80k on the odometer, a relatively straight body and a half-assed primer paint job all around. The seller was a kid in Grand Junction who had fixed it up for home-school credit, and though it died halfway home on the road back to Denver, I believed that with a copy of the Compleat Idiot filled with the gorgeous illustrations by Peter Aschwanden, I could keep my Bug going.
I actually did keep it going for a while. I cannot claim to be mechanically gifted, but I replaced some necessary things--starter, carburetor, the exhaust system--and I also invested in a new paint job to bring it back to its original gulf blau splendor. By day, I sat at a keyboard, staring at empty text docs, waiting for inspiration; at night and on weekends, I scraped up my knuckles and got grease in my hair, and I was rejuvenated.
Then about a year ago the Bug threw a rod or something. I still don't know what happened, but I knew it meant it was time for a rebuild. Actually, I knew it was time for something else: to turn it into an Electric Bug.

* * *
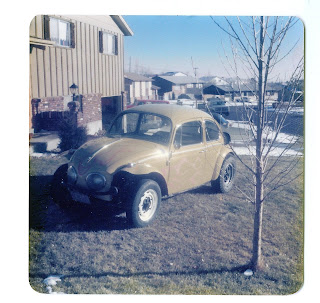
Dad's homemade Baja in 1975.
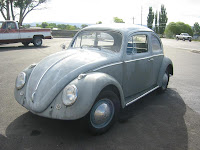

 My current Bug, as I first saw her on eBay (top),
waiting for a new paint job (center),
and in the frost at home last fall (bottom).
* * *
Somehow I convinced my wife to let me buy one on eBay a few years ago, a 1963 model with 80k on the odometer, a relatively straight body and a half-assed primer paint job all around. The seller was a kid in Grand Junction who had fixed it up for home-school credit, and though it died halfway home on the road back to Denver, I believed that with a copy of the Compleat Idiot filled with the gorgeous illustrations by Peter Aschwanden, I could keep my Bug going.
I actually did keep it going for a while. I cannot claim to be mechanically gifted, but I replaced some necessary things--starter, carburetor, the exhaust system--and I also invested in a new paint job to bring it back to its original gulf blau splendor. By day, I sat at a keyboard, staring at empty text docs, waiting for inspiration; at night and on weekends, I scraped up my knuckles and got grease in my hair, and I was rejuvenated.
Then about a year ago the Bug threw a rod or something. I still don't know what happened, but I knew it meant it was time for a rebuild. Actually, I knew it was time for something else: to turn it into an Electric Bug.
* * *
A VW Family Album

Mom and her Bug in Brodhead, Wisconsin.
* * *

Dad's homemade Baja in 1975.
* * *

When I was in high school, Dad and I chopped the top on a '64.
* * *

 My current Bug, as I first saw her on eBay (top),
waiting for a new paint job (center),
and in the frost at home last fall (bottom).
* * *
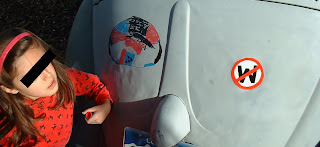
Don't blame the kid for the anti-Bush logo on the decklid--I did it myself,
and proudly!
Subscribe to:
Posts (Atom)
